What are dog powered sports?
Canicross, Bikejoring, Skijorring, Urban Mashing, Dog Sledding- these are all dog powered sports. Sports where the dog pulls and powers the movement of the human and their ‘vehicle’.
CANICROSS- cross country running with one or more pulling dogs- some also walk, hike, or snow shoe- the mechanics are the same. The canicross musher wears a specific belt so that the dog pulls them ergonomically to assist in pulling them forward.
BIKEJOR- one or more dogs attached to a bicycle. These are usually mountain bikes for dryland or ‘fat bikes’ for use on snow.
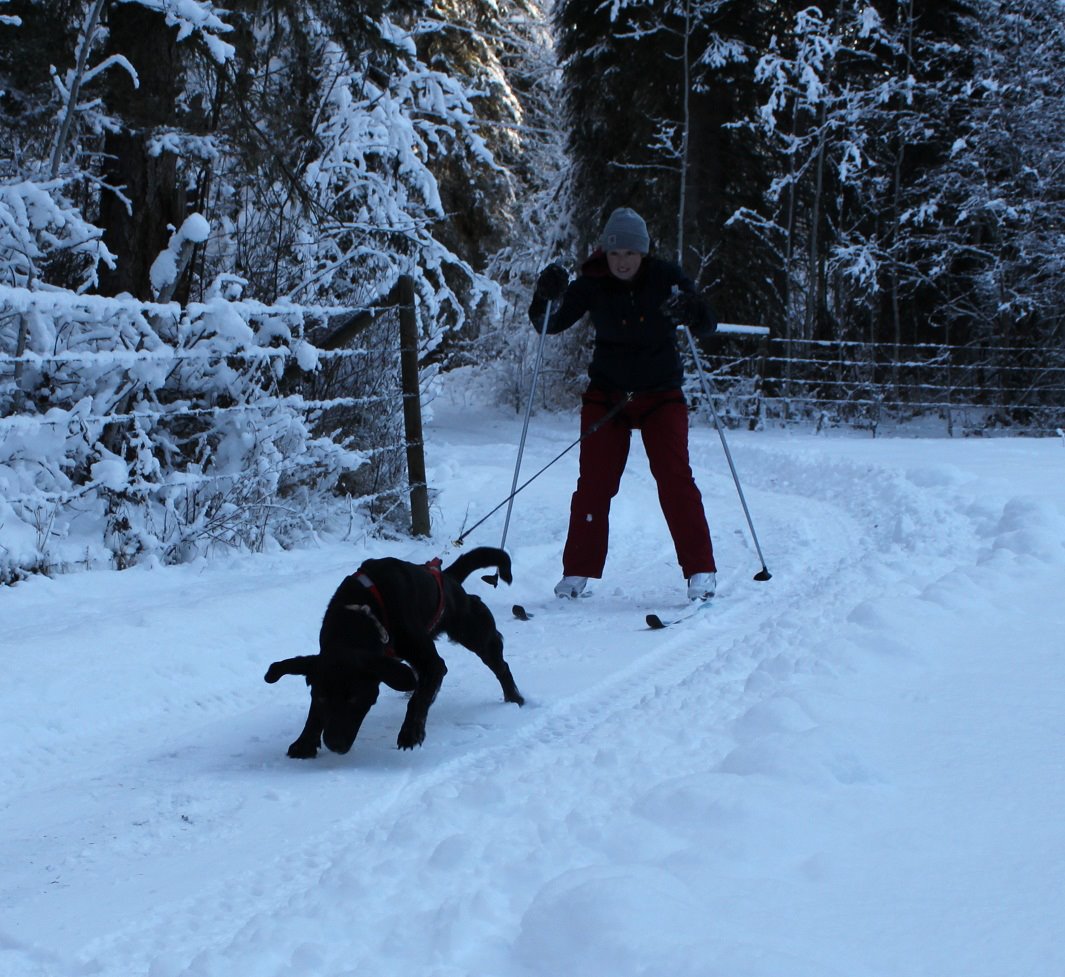
SKIJOR- one or more dogs attached to a skier wearing a belt. The skier may use any sort of skis but classic skis or skate skis are most common.
URBAN MUSHING- Scooters, carts, or sulkies driven by a musher and pulled by dogs, typically on maintained paved or otherwise groomed city trails.
DOG SLEDDING- using various types of sled ranging from a vary light kicksled designed for use with one dog and an active musher, to heavier sleds built for bigger teams and hauling cargo, and everything in between. Dogs are typically hooked two by two across groomed snowy trials.
What’s the point?
Exercise. Fun. A release for the genetic desire of dogs to pull. Enrichment. Improved health and well being for the musher and the dogs.
So how do I get started?
This lesson will help you get started with some info about the sport and how to introduce basic commands. We’ll talk about this in terms of training for canicross as it will lay a good foundation for all variations of dog powered sports, requires the least amount of equipment, and is something any dog and any human can enjoy.
Equipment needed: Very little!
For the human, a canicross belt (if you intend to switch to a different dog powered sport, you may be able to skip this for now. However, any duration of canicross, weather you are walking or moving faster), a proper belt will save your back. Your dog will be pulling you so a a belt specifically for canicross that fits low on the hips, and allows full range of motion of your legs ensures the dogs cannot pull you off balance easily and allows your hands to be free. We use the canadog brand canicross belt but there are several styles available from different brands. Please note that not all ‘hands free’ dog walking belts are designed for pulling canicross dogs. If you are doing foundation work with the intention of doing solely skijorring, go ahead and get a skijor belt right away and skip the canicross belt.

VIDEO: How to wear the canicross (or skijor) belt :
For the dog: A properly fitting non-restrictive pulling harness. This is NOT a weightpull harness (which are meant for use of a single dog pulling a very large load at a very slow speed for a short distance). For dog powered sports, you’ll need one that is meant for pulling AND running in -yes, even if you are planning to cani-walk. For canicross, we like a short half-harnessbecause they are designed to have a higher pulling point- the human musher is typically taller at the waist than the height of the pulling dog. However a general purpose sled dog harness like an xback works too and is a better choice if you want to pursue sledding in the future. The important thing is that your dog’s harness fits well, allows them to pull with the brunt of the weight being placed on the breastbone without compromising their wind pipe and of course, it is essential to allow free range of motion in all of the limbs and the entire shoulder.

Video: How to put on and size a sled dog harness:
Connecting the Dog to the Human: Ideally, you want a line with snaps on each end- one will attach to the dog’s harness and one will attach to your canicross belt. A light bungee shock absorber that neither wastes pulling energy nor jars you while being pulled in an ideal component of the line- if your dog is pulling a device like a cart, bike, or sled, opt for a heavier bungee insert and connect it directly to the vehicle and omit the snap at that end.
First lesson – LINE OUT
What you need – your dog, a properly fitting harness, leash, food treats, and visual target x2 (tupperware container or lid works great)
Objective- the end goal of the Line Out skill is that the dog, once harnessed and hooked up, will move forward ahead of the musher maintaining line tension and hold it, while waiting for a forward command. This is a great skill for when you are about to start your run, so that your dog can be hooked up and waiting in position without tangling while you finish the final preparations. It is also a crticial skill out on the trail- if your dog turns towards you when you stop, they will tangle themselves or you in the line, which is a safety concern. There are many ways to teach this skill but this particular groundwork game is a good way to get started.
Step 1: Get your dog harnessed. Attach leash to harness. Have your treats and target handy. While maintaing control of your dog (and so that they are watching), load the target. Take a few steps back from the target and then turn to face it. If this is your first time teaching a send to target behavior, then you’ll initially just want to let your dog go to the target as soon as they are looking at it. Use a release word for this (I say Okay, which is incidentally also my ‘forward’ mushing cue).
PRO TIP: Work in your hallway or another narrow space/trail, to start to give your dog the context that the only direction of travel is forward and not sideways.
Once your dog has realized that they get to eat the treat off the target, you’re going to start introducing her to harness pressure. To do this, load the target and return to your starting position. Very gently pull backwards on the leash so that the dog can just feel that you are putting some tenstion there. As soon as there is tension, send them to the treat. MAINTAIN THE TENSION until the dog gets to the treat. Repeat this several times.
As your dog begins to figure out this sequence, introduce the cue “Line Out!” as you initiate the harness tension. You can vary the length of time you wait to send the dog a bit but don’t go overboard on duration yet- you don’t want to risk the dog turning back towards you, forward movement with eyes locked onto the treat target is what we want- do not add duration if you’re not getting full focus on the target.
Troubleshooting: If your dog backs up or fails to move forward when you send them to the treat target, use less tension, and start very close to the target. For smaller dogs or very sensitive dogs, just the weight of the leash being tight may be noticeable. It is likely that most dogs at some point have been taught ‘loose leash walking’ skills which usually involve teaching the dog to give to leash tension. But, for this- we WANT them to pull (hence the pulling harness). It’s just a matter of gradually teaching the dog that pulling on their pulling harness is not the same thing as pulling on the leash- and this is why maintaining tension all the way to the treat is imperative. We do not want ‘release of tension’ to be the reward or the cue to move forward. Steady, gentle, light tension at first.
Keep at this stage until your dog is eagerly leaning into their harness and happy to maintain the tension on the way to the treat.
NOTE: Do not use a toy reward. Do not reward your dog from your hand during this session- we really need to emphasize that the dog is pointing away from the handler and all rewards come from out front. Eventually, the reward for pulling out ahead will be movement, but for now make use of the food target.
Step 2- Double treat target.
Now we’re going to start asking the dog to be responsible for putting tension on the line themselves! In your hallway or narrow ‘trail’ training setting, load your first target, take a few steps back, load the second target and take a couple of more steps back. You and your dog should be inline with both treat targets.
(Human/dog) ——–>treat target——->2nd treat target
First, start as you did in step 1 by placing tension on the dog’s harness via the connected leash, and cue “Line Out!” Release them to the first target (if they try to go past it, gently prevent that with the leash by just holding your ground). Once the first treat has been consumed, have them carry on to eat the 2nd treat without further direction. Maintain leash tension continuously until both treats have been consumed.
Do this until the pattern of wait- eat treat 1- eat treat 2 are happening in bold succession and without confusion.
Then, you will load the two treat targets, return to starting position, and this time, do not initiate tension yourself. Let your leash hang with a few inches of slack and ask ‘line out’. If your dog moves forward and puts even a little bit of tension into the harness, send them to both treats (and maintain that tension). Caution: If your dog is very enthusiatic, you need to be really careful that the dog’s line out does not result in a jerking motion. If you suspect this might happen, limit how much slack is in your leash to start with and be prepared to move with the dog as they put weight into their harness. We do want an enthusiastic line out but especially in the early stages, we do not want the dog to come to a jarring halt as that tends to feel like a correction and most dogs will then back up or return to the handler. Be a bit proactive on this.
When your dog starts to get the hang of this, move you starting position a back a little further from the first treat target, and start to require that the dog has to take a few more steps forward before they’ll feel the ‘line out’ leash tension. As their confidence grows, begin to build up the duration of how long they must hold the line out before they are sent to the treat. Build up slowly. Holding the line tight, even without a whole lot of tension, is preferable to vigorously tightening/backing off/retightening or any movement of the dog back towards the handler.
Video: Here is Willy in her first ‘line out’ lesson using the treat target system.
Questions? Let me know! Watch for the next steps in teaching line out, as well as video lesson on how to teach some other canicross commands.

Recent Comments